


The socket reads voltage and amperage, counts power consumption, and how well the network parameters meet the requirements.
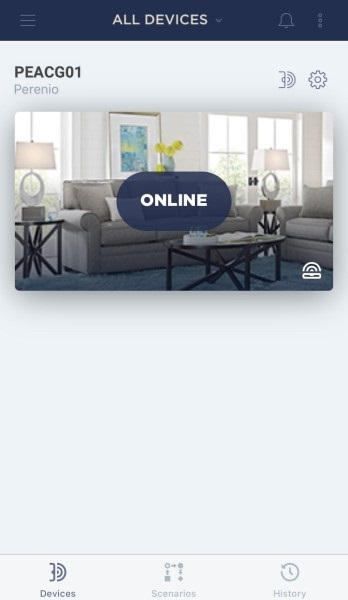
Yes, you can check the status of the sensor in the Perenio Smart App. If the sensor is connected and working, then in the APP you will see the ONLINE status. If the battery of the sensor is discharged or for some reasons there is no connection, the application will display the status that the sensor is OFFLINE.
This guide will help you solve this problem https://android.gadgethacks.com/how-to/fix-delayed-notifications-your-galaxy-s8-s8-0177437.
- Plug the Power Link into a power source and activate it in the Perenio Smart Mobile Application.
Warning! Perenio Smart Home requires a Perenio Control Gateway or an IoT Router to activate the device.
- Download the Amazon Alexa app on the Google Play or App Store. Log in or register.
- Click on the “Devices” tab in the lower right corner of the screen.
- Next, click on “+” and select “Add device”.
- On the device type selection screen, select “Other” and then click on “skill store”.
- Enter and select the Perenio: Smart Home and Office in the search bar.
- Next, click “Enable to use”, after which you will be redirected to the login page for your Perenio account, where you must enter the account information in which the power plug is connected.
- Then close the successful activation window and click “Discover devices”.
- The device search process begins, which takes around 45 seconds.
- The found power plug will be displayed on the Devices tab in the application.
- You can now control the plug through Alexa's voice assistant.


- Connect the infrared remote control to a power source.
Note. Any suitable USB Charger (Output: 5V/1A) may be used to connect the device to the mains socket.The Red Atom infrared remote control can also be powered by a third-party device with a USB connector (PC, laptop, portable charger, set-top box, external battery, etc.).
- Activate the remote control in the Perenio Smart Home app and add controlled household appliances to it.
- Download the Amazon Alexa app on the Google Play or App Store. Log in or register.
- Click on the “Devices” tab in the lower right corner of the screen.
- Next, click on “+” and select “Add device”.
- On the device type selection screen, select “Other” and then click on “skill store”.
- Enter and select the Perenio: Smart Home and Office in the search bar.
- Next, click “Enable to use”, after which you will be redirected to the page for entering the Perenio personal account, where you must enter the account information in which the infrared remote control is connected.
- Then close the successful activation window and click “Discover devices”.
- The device search process begins, it takes around 45 seconds.
Warning! The Amazon Alexa app connects home appliances controlled by a Red Atom remote. The remote control itself will not be displayed in the list of connected devices.
- Found household appliances will be displayed on the Devices tab in the application.
- Now you can control household appliances through Alexa's voice assistant.

Warning! To activate the device in the Apple HomeKit application, Control Gateway or IoT Router are not required.
- Insert the Power Link device to the source of power.
- Turn it on by pressing the power button (the indicator on the power button will blink green).
Note. When you first switch on the Power Link device, or did not activate it in the Perenio Smart App through the Control Gateway or the IoT Router, the default mode will be the Bluetooth (MFi) Mode.
- Open the “Home” mobile application on your smartphone (Apple HomeKit) and click on the “Add Accessory” button.
- Scan the QR code available in the quick start guide and confirm the addition of an uncertified accessory, if necessary.
- Wait for the connection process to complete.
- After a successful connection, select the plug installation room and click Next.
- The connected device appears on the main screen of the application (if it includes in Favorites).


Warning! For this feature to work, the iPad must be constantly in the house and provided with uninterrupted power.
- Connect the Power Link to the Home app.
- Next, go to the settings on your iPad, find «Home» in the list of applications and turn on the iPad as a home accessory center.
- After that, in the Home application, click on the icon in the upper left corner and make sure that your iPad is displayed in the "Hubs and Bridges" tab.
- Now you can configure the automation you need (tab “Automation” in the Home application).
- To do this, click "Create New Automation" and select the appropriate one from the list.
- Then add the connected outlet and script for automation.
- Now the Power Link will respond to changes in the house.


- Activate the power plug in the Apple HomeKit app.
- Then, on the main screen of the application, click on “+” in the upper right corner and select “Add Scene”.
- Next, click "Custom”.
- Enter a name for the scene and add the Power Link socket to the created scene.
- You can check the scene, add additional devices to it, or add it to Favorites to appear on the main application screen.
- Click “Done”.
- To control Power Link using Siri's voice assistant, you need to pronounce the name of the configured scene or a specific command, for example, “Turn on/off the socket”.


With it you can control the energy consumption of various electrical appliances.
No, the socket works autonomously with Bluetooth.
Yes, the socket has a built-in Real time Clock and a timer that allow you to create different scenarios for the socket. Including switching the appliances on and off at certain time.
Yes, Bluetooth and ZigBee provide remote control of the socket.
Yes, if you are connected to Perenio: Smart Home and Office.
It's simple: plug it into an electrical socket, press the button Power and Plug in to the app.
The socket reads voltage and amperage, counts power consumption, and how well the network parameters meet the requirements.
The history of logs can be viewed in the application Perenio: Smart Home and Office.
Yes, if you specify the names of the connected sockets. For example, you have a socketwhere an iron is always connected.
Yes, the socket is integrated into the Apple Home Kit.
Yes, it is visible in mobile application, as well as at built-in multicolor RGB indicator. The color is responsible for the current state of the socket.
No, all scenarios and user settings will remain valid because of the built-in Real time Clock.
The UV Lightsaber Smart Safety Kit is designed for remote disinfection of indoor air and surfaces using ultraviolet and ozone.
The socket is intended for indoor use only.
The lamp works on the principle of short-wave ultraviolet radiation in the range of 260-275 nm and destroys pathogens, destroying them at the cellular level. Ozone is also generated, which has an additional bactericidal effect and also eliminates foreign odors (dampness, mold, pets) even in hard-to-reach places.
Yes, the socket is fitted with safety shutters.
6000 hours.
The the socket will stop working but will retain its settings.
Yes, the lamp is turned on via the Perenio Smart and Perenio Lite app, as well as voice assistants.
Yes, you can control a smart socket from your smartphone, and customize your own scenarios in advance.
The Camera shall be installed indoors in such a way as to maximally cover the required field of view. It is placed on a horizontal surface or mounted on a 3M Tape.
No, it is forbidden to be in the room where disinfection is carried out.
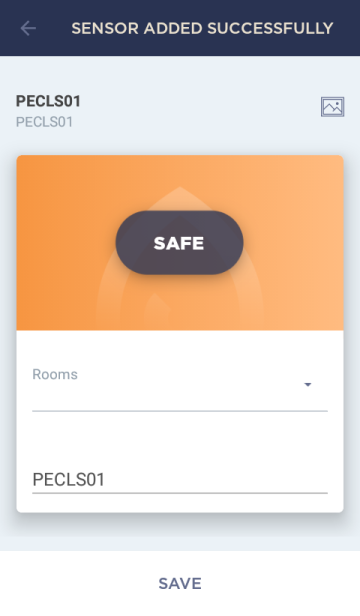
To connect the Sensor to the Control Gateway, you shall login to your Perenio Smart account and follow below steps:
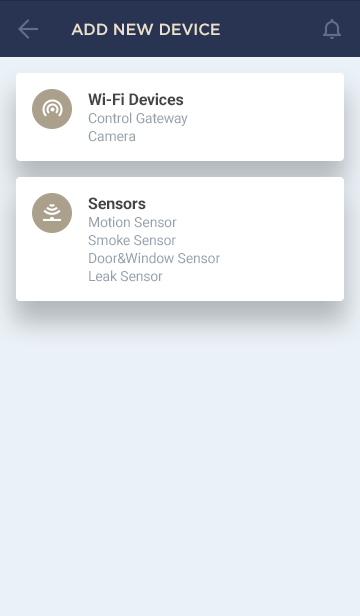
- Click on the icon in the upper right corner of the “Devices” tab and select “Add new device”. Then, click on the “Sensors” button in the list.
- Select the Control Gateway to which the Sensor should be connected.
- Wait until the process of searching for Sensors starts, then press and hold the reset button until the LED flashes.
- After successfully connecting the Sensor to the Control Gateway, enter its name and select the room.
Currently, the following modes of operation are available for the Indoor Fixed Camera:
- Live video streaming (without recording to the Cloud or the SD Card).
- Records upon motion detection if in the Armed Mode (30 seconds).
After disinfection, it is necessary to ventilate the room for 30 minutes.
Currently, the following modes of operation are available for the Indoor Fixed Camera:
- Live video streaming (without recording to the Cloud or the SD Card).
- Records upon motion detection if in the Armed Mode (30 seconds).
To activate the Indoor Motor PIR Camera in the Mobile App, the below simple steps shall be followed:
- Login to your account or download the Perenio Smart application and register a new User account.
- Scan the Camera's QR Code and connect it to your Wi-Fi network.
- Wait until the automatic connection to the Remote Server and Camera is completed.
- Select the Location for the Camera (Place of installation).
For more information, see below or download the manual from our website.
The Camera shall be installed indoors in such a way as to maximally cover the required field of view. It is placed on a horizontal surface or mounted on any surface using screws.
Yes, it’s enough to login to your account, select the Camera from the list of connected devices and click on the VIDEO Button.
Yes, you can configure your own lamp operation scenarios in the app and set the lamp operation by timer.
The scope of supply includes the Camera, the Power Adapter, the QSG and the Warranty Card.
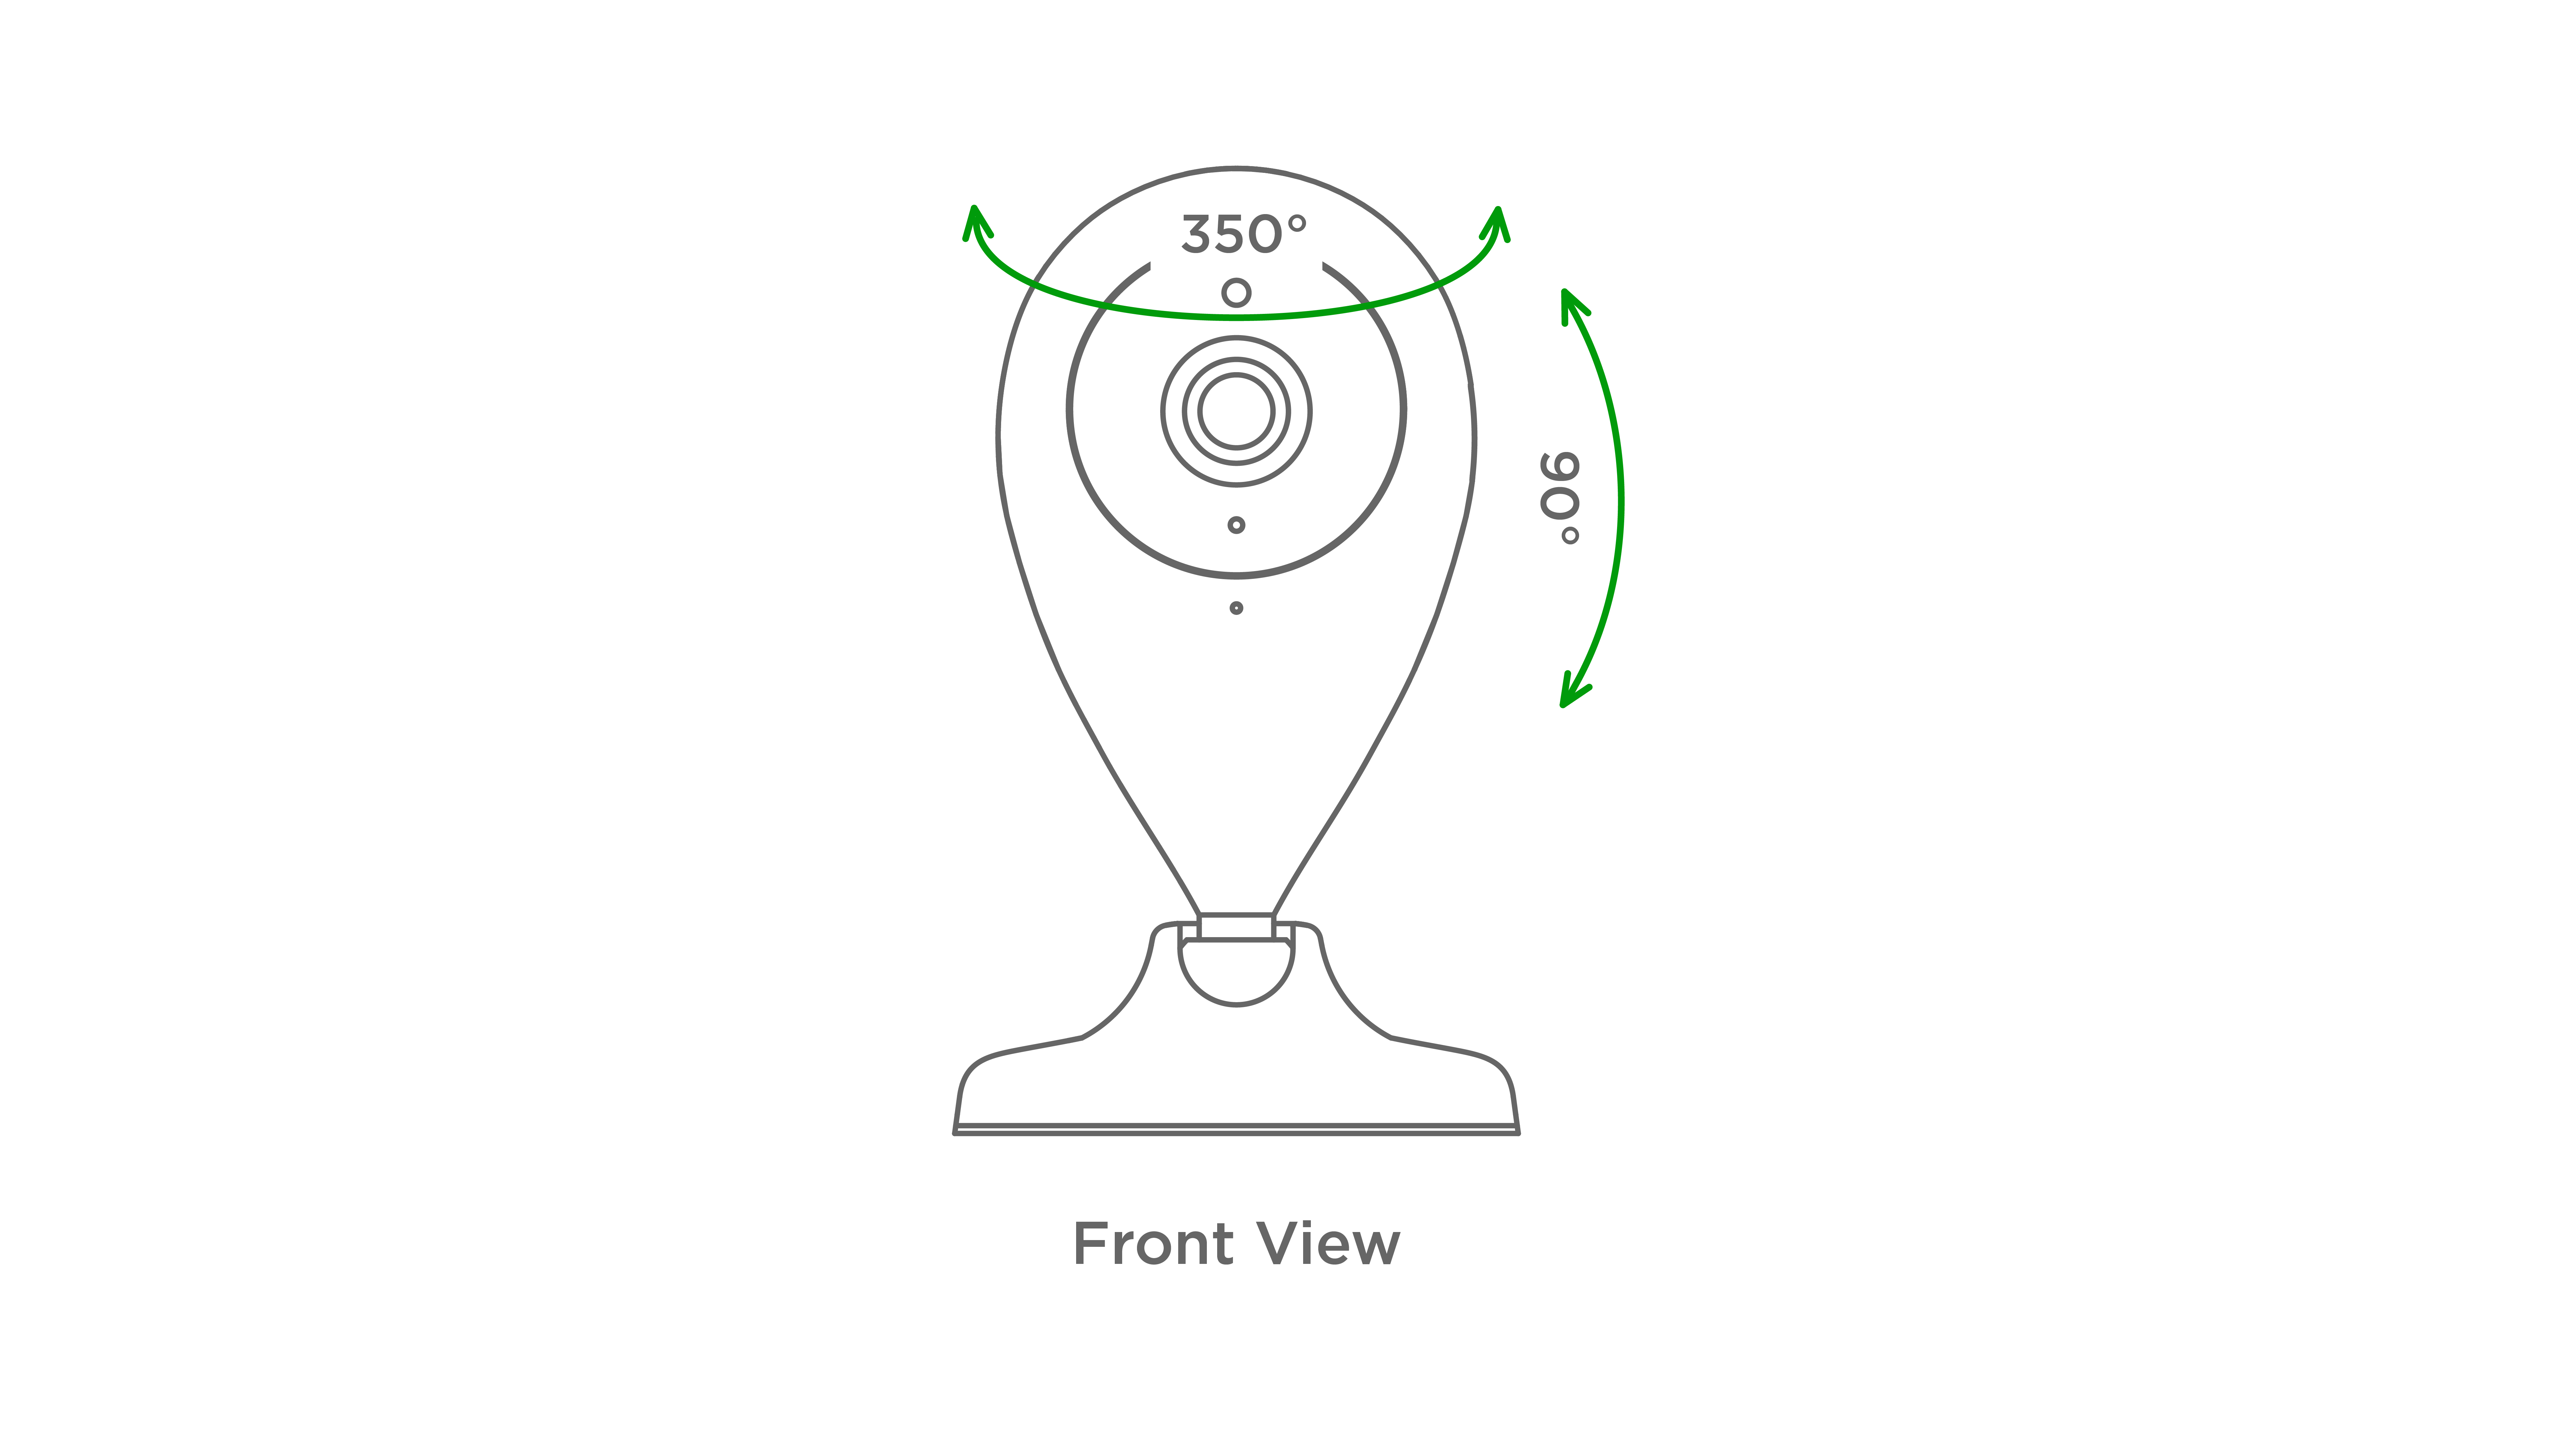
No, the Camera's head can only be rotated remotely from the Mobile App only (Using the virtual joystick in the Camera control panel). Manual rotation may damage the engine of the Camera and void the warranty.
Yes, it’s enough to login to your account, select the Camera from the list of connected devices and click on the VIDEO Button.
Yes, you can combine several lamps into a group and set up a schedule for it.
No, the Camera can only be rotated mechanically.
The process of resetting to factory settings is as follows:
- Press and hold the Reset Button located on the back of the Camera for at least 10 seconds.
- Release the Reset Button after the Camera beeps.
- Wait until the reset process of the Camera is finished (The Camera will appear in the list of available Wi-Fi Networks as the Access Point).
Yes, it is recommended to test the Smoke Sensor's alarm at least once a week.
Portable UV lamp destroys germs and dust mites in the places where it is installed. Also, the lamp helps to eliminate foreign odors (from mold, dampness, pets), even in hard-to-reach places. In addition, thanks to its compact design, the lamp is suitable for disinfection of small objects (refrigerator, cabinet, car).
To connect the Sensor to the Control Gateway, you shall login to your Perenio Smart account and follow below steps:
- Click on the icon in the upper right corner of the “Devices” tab and select “Add new device”. Then, click on the “Sensors” button in the list.
- Select the Control Gateway to which the Sensor should be connected.
- Wait until the process of searching for Sensors starts, then press and hold the reset button until the LED flashes.
- After successfully connecting the Sensor to the Control Gateway, enter its name and select the room.
All data and device settings will remain unchanged. After the power is restored, the device will be restarted in about 2 minutes and will become available for the User. In case of connection failure, it is recommended to reset the device and restart the Mobile App.
Install the Camera in another Room/Location (The Wi-Fi network in a new installation area will change):
- Sign in to the Perenio Smart app and select the Location where the Camera is activated.
- In the ‘Devices’ tab, select the required Camera from the list and click on the Settings icon.
- In the pop-up window, choose ‘Disconnect device’.
- Wait for around 3 minutes in order for the Camera to disconnect from the current Wi-Fi network.
- Disconnect the Camera from the mains.
- Move the Camera to another Room/Location and connect it to the mains.
- Wait until the Camera is rebooted (It usually takes no more than 2 minutes).
- Activate the Camera in the Mobile App according to par. 2.1 ‘First Installation and Configuration of the Camera’ (B-D) of the manual that can be downloaded from our website.
Yes, it is possible, but before the trip you need to disconnect the device through the Сamera settings and make sure that the new installation place will be provided with a stable Wi-Fi connection. When connecting to a new location, follow instructions for transferring the Camera to another Room or Location specified in the manual that can be downloaded from our website.
The lamp works on the principle of short-wave ultraviolet radiation. Radiation with a length of 253.7 nm destroys microorganisms by burning out their DNA and chromosomes, while radiation with a length of 187 nm generates ozone, which oxidizes the air, destroying bacteria and odors even in hard-to-reach places.
All data and device settings will remain unchanged. After the power is restored, the device will be restarted in about 5 minutes and will become available for the User. In case of connection failure, it is recommended to reset the device and restart the Mobile App.
Yes, you can disconnect the Sensor from the Control Gateway manually or in the Sensor settings in the application. In the first case, press and hold the reset button on the sensor until the LED flashes (It generally takes up to 5 seconds).
To check that the Sensor was disconnected, you should update the list in the “Devices” tab (Pull the screen down until the progress icon appears and the data is updated). If the Sensor is disconnected, it will disappear from the list of available devices.
15,000 hours.
The Indoor Motor Camera can be connected to a Wi-Fi network of 2.4 GHz only. However, Wi-Fi routers of most manufacturers support both frequencies (2.4 and 5.0 GHz) now, so if your Wi-Fi network is set to 5.0 GHz only, you should add an access point with a frequency of 2.4 GHz and the Camera will connect.
If the Wi-Fi network doesn't change, it is enough to disconnect the device from the power source and unscrew it (if mounted), install it in a new room and connect it to the power source again. After 1-2 minutes, the Camera will appear in list of devices. If the Wi-Fi network changes, follow instructions specified in the Camera’s manual (Changing the Room or Location for Cameras Section) that can be downloaded from our website.
To use a MicroSD Card, you should buy it and insert it into a special slot on the Camera's back. The recommended Card Class and its capacity are specified in the Camera manual.
The Indoor Fixed Camera is equipped with 8 Infrared LEDs that light up in the dark and provide visibility at night. These LEDs will be barely visible in the dark as the peak wave length is 850 nm.
When turning on the UV lamp for the first time, you need to charge it by connecting it to a power source. After the lamp is fully charged, disconnect it from the mains and press the power button. Disinfection will start in 15 seconds.
The UV lamp disinfects the room for 30 minutes, after this time it automatically turns off.
Install the Camera in another Room/Location (The Wi-Fi network in a new installation area will change):
- Sign in to the Perenio Smart app and select the Location where the Camera is activated.
- In the ‘Devices’ tab, select the required Camera from the list and click on the Settings icon.
- In the pop-up window, choose ‘Disconnect device’.
- Wait for around 3 minutes in order for the Camera to disconnect from the current Wi-Fi network.
- Disconnect the Camera from the mains.
- Move the Camera to another Room/Location and connect it to the mains.
- Wait until the Camera is rebooted (It usually takes no more than 2 minutes).
- Activate the Camera in the Mobile App according to par. 2.1 ‘First Installation and Configuration of the Camera’ (B-D) of the manual that can be downloaded from our website.
The Motor PIR Camera is equipped with 11 Infrared LEDs that light up in the dark and provide visibility at night. These LEDs will be barely visible in the dark as the peak wave length is 850 nm.
No, but the lamp has a delayed start function for 15 seconds so that you can safely leave the room before disinfection begins.
The Indoor Fixed Camera can be connected to a Wi-Fi network of 2.4 GHz only. However, Wi-Fi routers of most manufacturers support both frequencies (2.4 and 5.0 GHz) now, so if your Wi-Fi network is set to 5.0 GHz only, you should add an access point with a frequency of 2.4 GHz and the Camera will connect.
Most likely, your Camera is in the Disarmed Mode.
Yes, you can disconnect the Sensor from the Control Gateway manually or in the Sensor settings in the application. In the first case, press and hold the reset button on the sensor until the LED flashes (It generally takes up to 5 seconds).
To check that the Sensor was disconnected, you should update the list in the “Devices” tab (Pull the screen down until the progress icon appears and the data is updated). If the Sensor is disconnected, it will disappear from the list of available devices.
After the device is powered on, the power LED will light up, and a corresponding access point of this CG (containing its ID) will be displayed in the list of available networks in Wi-Fi Settings of your smartphone.
With it, you can remote control & monitor of the energy consumption of various household appliances.
Yes, Wi-Fi provides remote control of the socket. You can operate the smart plug via the free mobile app Perenio Smart or voice assistant.
All data and device settings will remain unchanged. After power is restored, the device will be restarted and become available for the User control within 2 minutes. In case of a connection failure, it is recommended to restart both the device and the Mobile App.
The process of resetting to factory settings is as follows:
- Press and hold the Reset Button located on the back of the Camera under the antenna for at least 10 seconds (a distinctive click should sound).
- Release the Reset Button after the Camera beeps.
- Wait until the reset process of the Camera is finished (The Camera's head stops rotating in all directions and returns to its original position).
Yes, if you are connected to the free mobile app Perenio: Smart Home and Office.
Install the Camera in another Room/Location (The Wi-Fi network in a new installation area will change):
- Sign in to the Perenio Smart app and select the Location where the Camera is activated.
- In the ‘Devices’ tab, select the required Camera from the list and click on the Settings icon.
- In the pop-up window, choose ‘Disconnect device’.
- Wait for around 3 minutes in order for the Camera to disconnect from the current Wi-Fi network.
- Disconnect the Camera from the mains.
- Move the Camera to another Room/Location and connect it to the mains.
- Wait until the Camera is rebooted (It usually takes no more than 2 minutes).
- Activate the Camera in the Mobile App according to par. 2.1 ‘First Installation and Configuration of the Camera’ (B-D) of the manual that can be downloaded from our website.
Perenio is not just a Smart Home, but a home and office control system. What we deliver is not just physical devices, but universal solutions that work on the basis of a global platform with such advantages as a secure system with localized software and firmware, an intuitive mobile application for Android and iOS, available ZigBee wireless devices, as well as a distributed cloud storage with the main server in Germany in accordance with the GDPR. As a result, the user gets a packaged solution. In addition, we provide online technical and call center support in each country. User's experience it the main priority for us, as everything is done for a person who should feel comfortable in this ecosystem.
The warranty period for our devices is up to 24 months. For more information, see our website.
This opportunity is available, but we can not guarantee the correct connection and control so that you should consult with our Tech Support Department in each specific case.
Device installation and operation manuals are currently available for downloading in Russian, Ukrainian, and English.
Updates are needed to improve the functionality of our devices. They have no negative impact on the operation of the system.
All Perenio devices are currently white. In the future, there will be other color and design options.
Yes, you can use the same login and password for your account on multiple smartphones or create several accounts and give the right to view data on devices to other users.
You can recover your password using the “Forgot your password?” option on the Mobile App login screen. You will receive instructions with the link to reset your password to the specified email.
The application runs on smartphones with the iOS 11.0 and later operating system versions and Android 5.1. Work on other versions of the operating systems is not guaranteed. The application is available for download in the Apple Store and Google Play.
Yes, you can manage all devices through the Mobile Application, as well as create scenarios and configure interactions between them.
Mains-operated Perenio devices will connect to the Wi-Fi network automatically and continue operation after the Internet connection or the power is restored. Management of battery-operated Sensors will depend on the Control Gateway.
Possible reasons may be as follows:
- - Incorrect smartphone settings. Some smartphones block push-notifications from applications to save battery power. Check the Mobile App settings in your smartphone;
- - Your Location is in the Disarmed Mode, and no Alarms are available.
Currently, successful connection is guaranteed for Perenio Sensors only. You can purchase similar devices in our online store or consult on the issue of connecting specific devices with our Technical Support Department.
Our system is not intended for covert surveillance, and we do not declare such properties. However, you can try to install Cameras in such a way as to ensure they do not catch the eye.
You need to take a legal advice in each particular case. As a rule, the use of Cameras to monitor your own housing causes no problem. However, if you want to monitor office activities, you will need to post signs saying that "This area is under surveillance", issue the Company Order describing the purpose of installing Cameras as well as familiarize all employees with it and get consent for personal data collection.
Conditions of use (temperature limits, humidity, etc.) are specified in each device manual available for downloading on our website. If your desired installation place satisfies these conditions, it will be no trouble.
You can add an unlimited number of devices.
The scope of supply includes the Camera, the USB-MicroUSB Cable, the Power Adapter, the 3M Tape, the QSG and the Warranty Card.
See image below.
See image below.
To activate the Indoor Fixed Camera in the Mobile App, the below simple steps shall be followed:
- To your account or download the Perenio Smart application and register a new User account.
- Scan the Camera's QR Code and connect it to your Wi-Fi network.
- Wait until the automatic connection to the Remote Server and Camera is completed.
- Select the Location for the Camera (Place of installation).
For more information, see below or download the manual from our website.
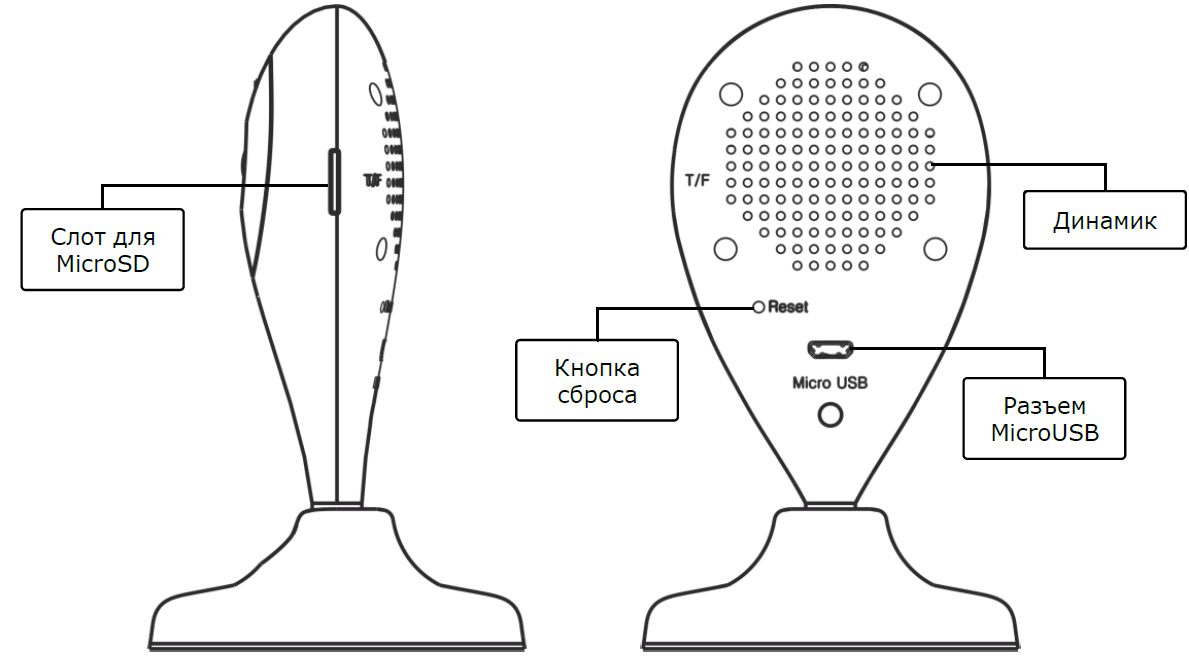
The USB-MicroUSB Cable port is located on the back side of the Camera (See image below).
The Reset Button is used to reset a device to factory settings.
The Reset Button is used to reset a device to factory settings.
Yes, the User can rotate the Camera's head from the smartphone, as well as start video recording, take images and set various scenarios.
Yes, it is possible, but before the trip you need to disconnect the device through the Сamera settings and make sure that the new installation place will be provided with a stable Wi-Fi connection. When connecting to a new location, follow instructions for transferring the Camera to another Room or Location specified in the manual that can be downloaded from our website.
If the Wi-Fi network doesn't change, it is enough to disconnect the device from the power source and unstick it (if the 3M tape was used), install it in a new room and connect it to the power source again. After 1-2 minutes, the Camera will appear in list of devices. If the Wi-Fi network changes, follow instructions specified in the Camera’s manual (Changing the Room or Location for Cameras Section) that can be downloaded from our website.
If the Wi-Fi network doesn't change, it is enough to disconnect the device from the power source and unstick it (if the 3M tape was used), install it in a new room and connect it to the power source again. After 1-2 minutes, the Camera will appear in list of devices.
If the Wi-Fi network changes, follow instructions specified in the Camera’s manual (Changing the Room or Location for Cameras Section) that can be downloaded from our website.
All data and device settings will remain unchanged. After the power is restored, the device will be restarted in about 2 minutes and will become available for the User. In case of connection failure, it is recommended to reset the device and restart the Mobile App.
The Indoor Fixed Camera is equipped with 8 Infrared LEDs that light up in the dark and provide visibility at night. These LEDs will be barely visible in the dark as the peak wave length is 850 nm.
The Indoor Fixed Camera can be connected to a Wi-Fi network of 2.4 GHz only. However, Wi-Fi routers of most manufacturers support both frequencies (2.4 and 5.0 GHz) now, so if your Wi-Fi network is set to 5.0 GHz only, you should add an access point with a frequency of 2.4 GHz and the Camera will connect.
You can add an unlimited number of devices.
Most likely, your Camera is in the Disarmed Mode.
This Sensor is sensitive to the movement of thermal objects in the area of its installation and transmits a corresponding alarm to the Perenio® Control Gateway.
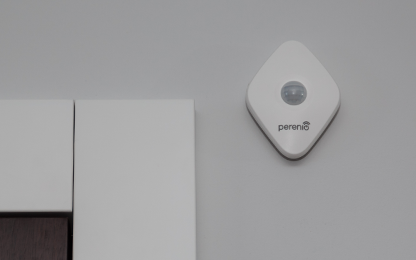
On the vertical surface with due consideration of the sensor orientation (For details, see Manual). It may be mounted on the 3M Tape or screws.
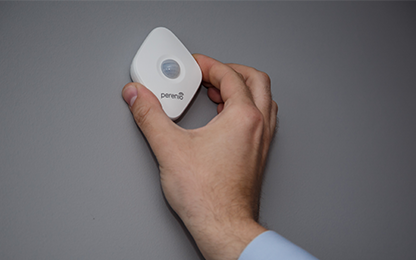
To turn on the Motion Sensor you should remove the back panel, open the battery cover and pull out the insulating strip. After that, the LED on its body will blink. The Sensor is considered to be switched on.
The package includes the Sensor (Battery included), dowels with screws, the 3M Tape, the QSG and the Warranty Card.
This is a part of the room within which the Sensor will detect movements. See picture below.
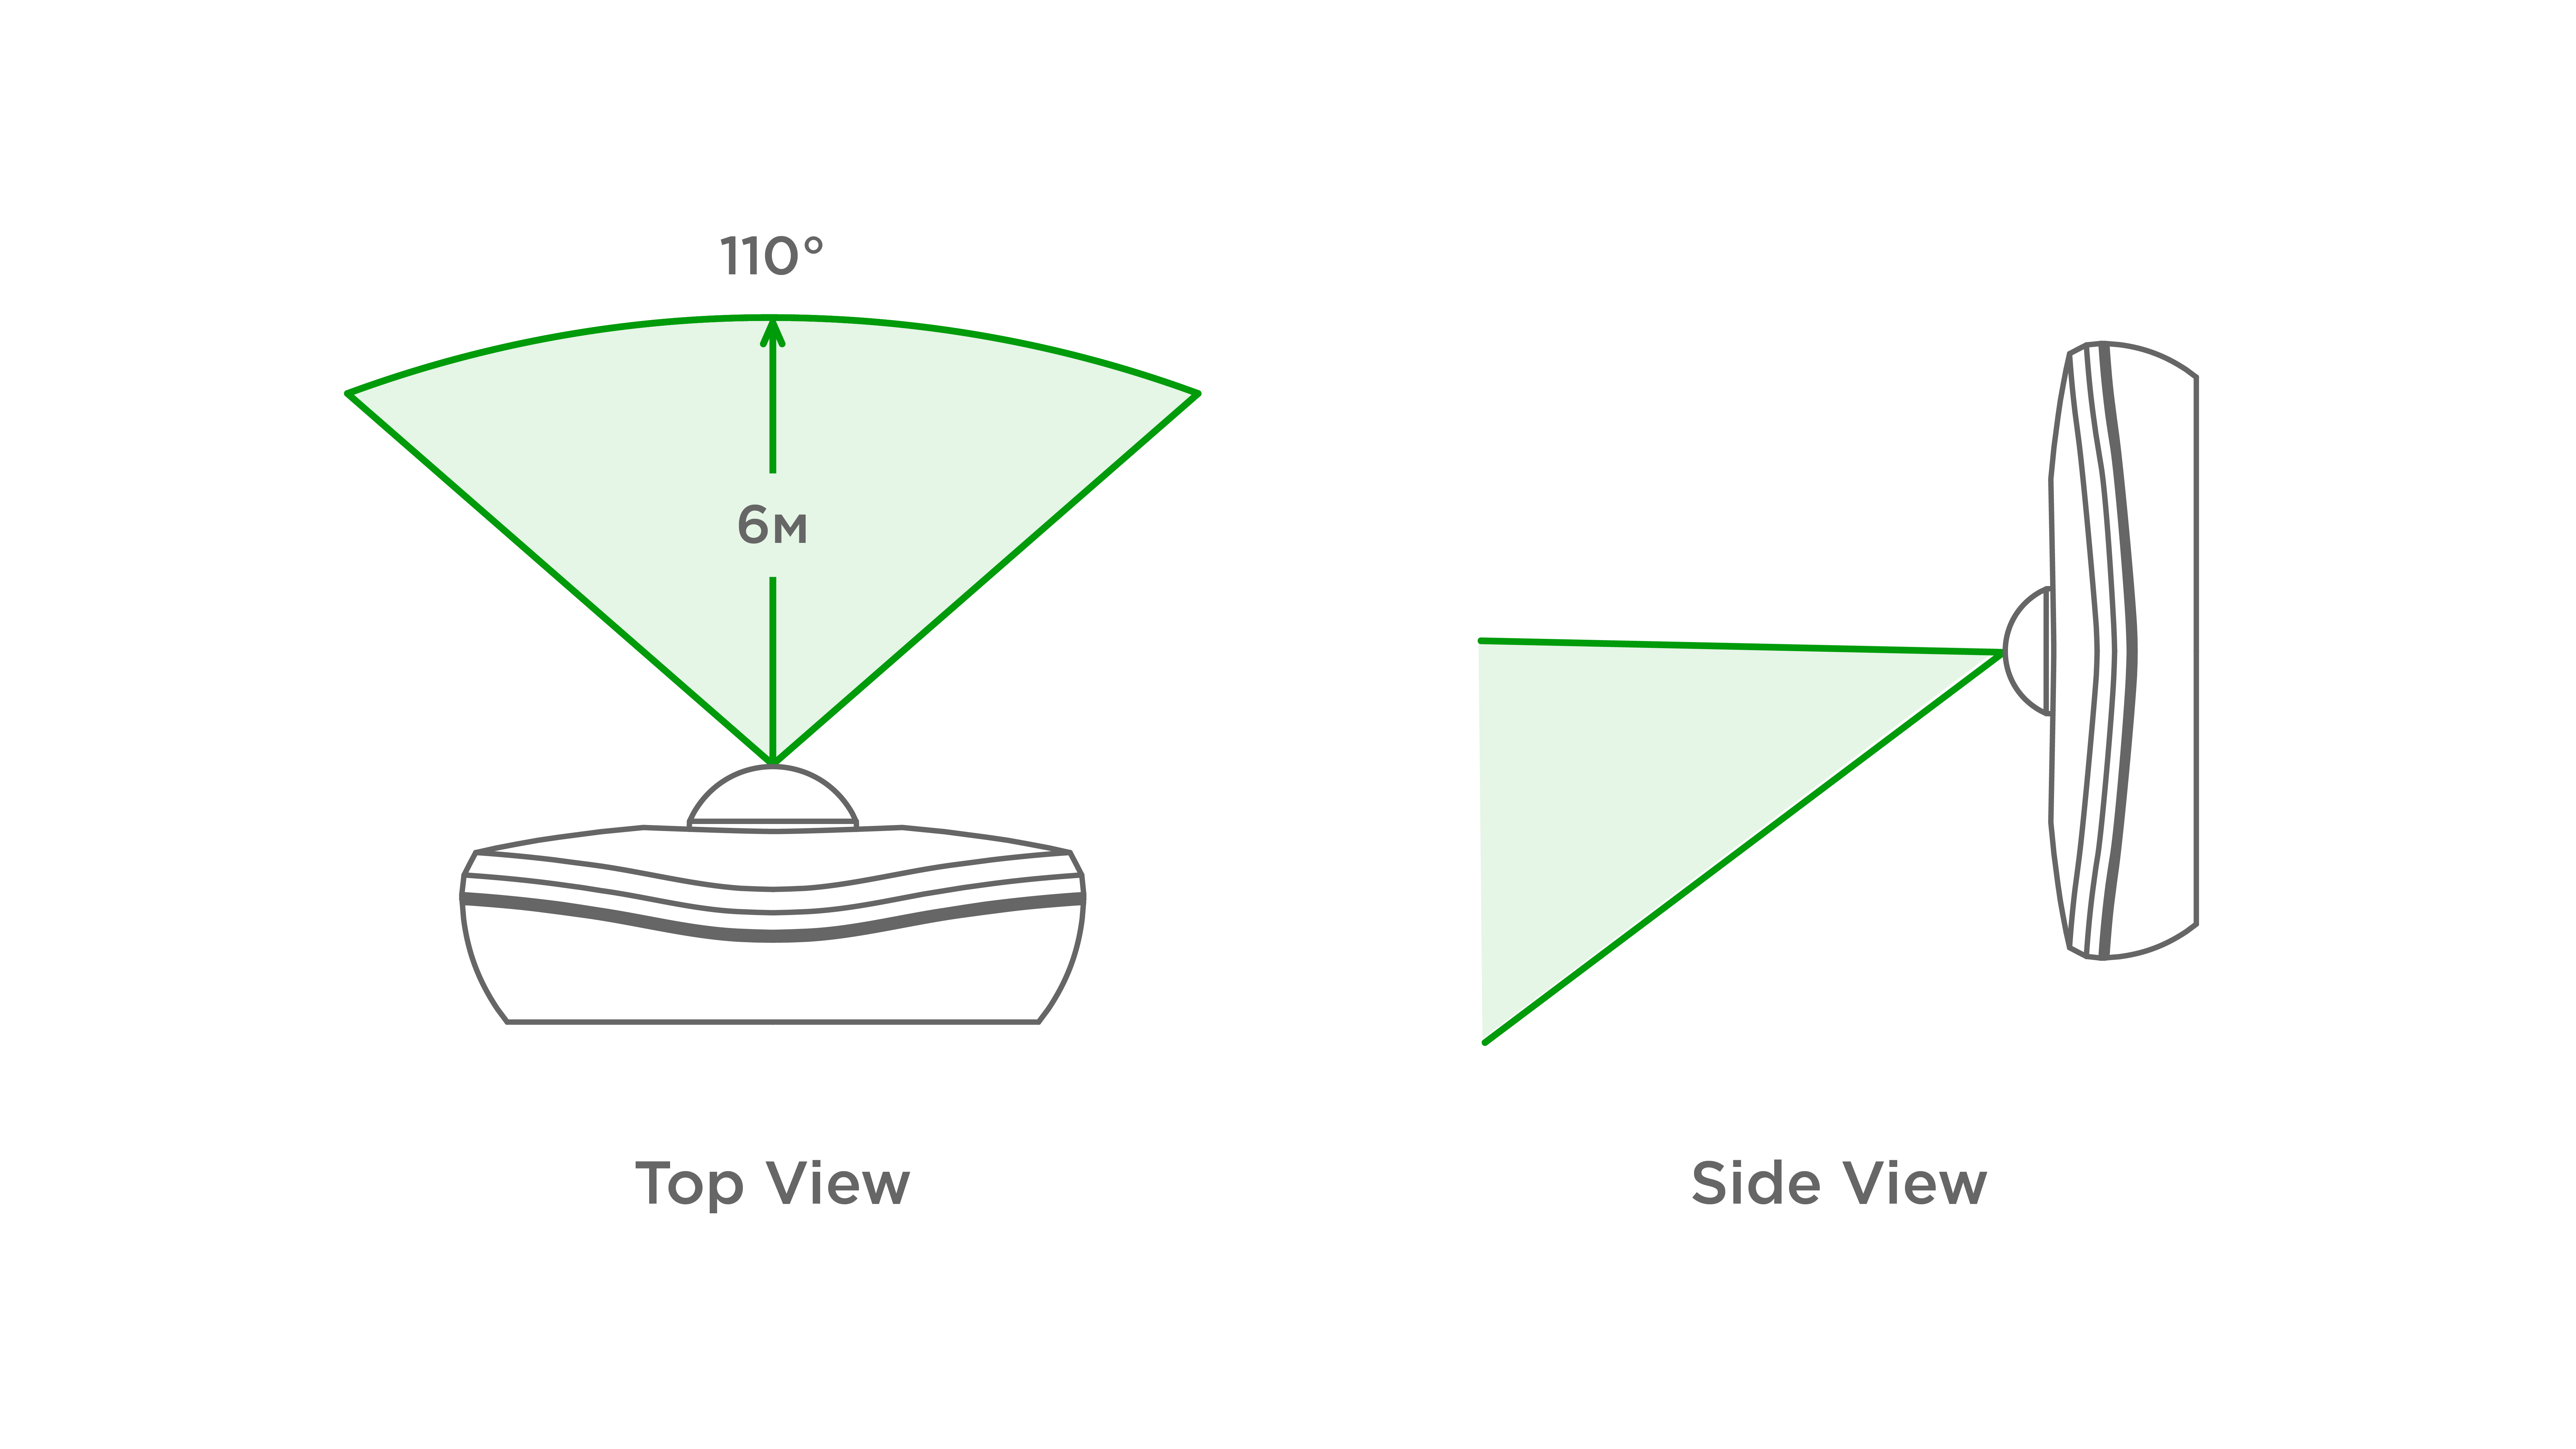
Up to 6 meters.
The Motion Sensor cannot operate autonomously, which means it is not capable to giving away a sound signal upon motion detection.
It is very likely that your Location is in the Disarmed Mode. In this case, notifications on the Motion Sensor actuation are displayed in the History tab only.
The Motion Sensor can operate on a single battery for up to 24 months.
It may work both in heated and non-heated rooms under normal operation conditions specified by the manyfacturer (See manual).
You can add an unlimited number of sensors to the control center.
Surely. The Motion Sensor is sensitive to the movements of thermal objects regardless of the level of lighting in the room.
It depends on the expected result. Generally, the Motion Sensor may not trigger if the door is opened, since it is sensitive to heat emission. In this case, the Door & Window Sensor will be more accurate if the goal is to identify the opening of the door, window, etc.
You should install one Control Gateway per each of the premises and connect Motion Sensors to them. Notifications from different Control Gateways will be sent to the User's account on a smartphone if such a User has access to above Control Gateways.
Possible reasons are as follows:
- - The Control Gateway is not activated in the Perenio Smart Mobile App or is not connected to the power supply;
- - The Sensor is already connected to another Control Gateway;
- - The Sensor battery level is too low;
- - The Sensor is located at a distance of more than 4.5 meters from the Control Gateway;
- - The Control Gateway is not connected to the network: Check the power supply;
- - A third-party sensor is connected that does not support a valid ZigBee Protocol.
This is a special element in the Sensor that is sensitive to a change in heat emission, thus providing high precision when detecting motion.
Yes, of course. There are several options for correct relocation of the device, namely:
1. Install the Sensor in another Room (The Sensor will remain connected to the same Control Gateway) as follows:
- Move the Sensor to another room and make sure it is at an allowable distance from the Control Gateway;
- Install the Sensor in a new room;
- Change the Room in Sensor settings in the User Account.
2. Install the Sensor in another Room/Location (The Sensor will be connected to another Control Gateway):
- Sign in to the Perenio Smart app and select the Location where the Sensor is activated;
- In the ‘Devices’ tab, select the required Sensor from the list and click on the Settings icon;
- In the pop-up window, choose ‘Disconnect device’;
- Move the Sensor to another room and make sure it is at an allowable distance from the Control Gateway;
- Install the Sensor in a new room;
- Reconnect the Sensor to the Control Gateway through the Perenio Smart application.
Yes, you can disconnect the Sensor from the Control Gateway manually or in the Sensor settings in the application. In the first case, press and hold the reset button on the sensor until the LED flashes (It generally takes up to 5 seconds).
To check that the Sensor was disconnected, you should update the list in the “Devices” tab (Pull the screen down until the progress icon appears and the data is updated). If the Sensor is disconnected, it will disappear from the list of available devices.
The Smoke Sensor detects visible smoke particles at the flameless stage and transmits a corresponding alarm to the Perenio® Control Gateway, as well as emits a loud signal.
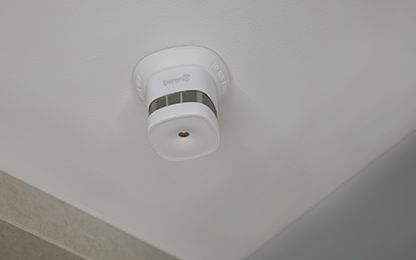
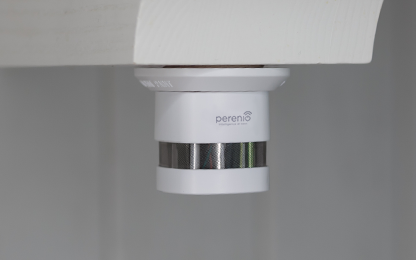
A Smoke Sensor is recommended to be installed in all rooms (apartment/house). When the room length exceeds 9 meters, it is recommended to install two Smoke Sensors. As a rule, the sensor shall be mounted on the ceiling using 3M Tape or screws (at a distance of at least 30 cm from lamps and decorations, as well as at a distance of at least 15 cm from walls and corners). Avoid installing the Sensor in the kitchen, garage, boiler room, etc., as they are subject to accumulation of combustion products.
Do not install the Sensor in rooms with high level of humidity, insects, dust and/or grease, as well as near air conditioners, ceiling fans and extract systems, including heaters and fluorescent lamps.
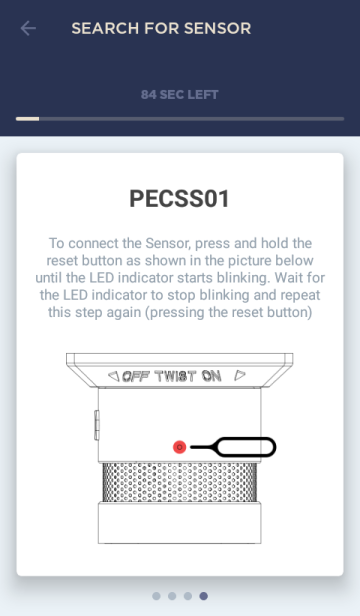
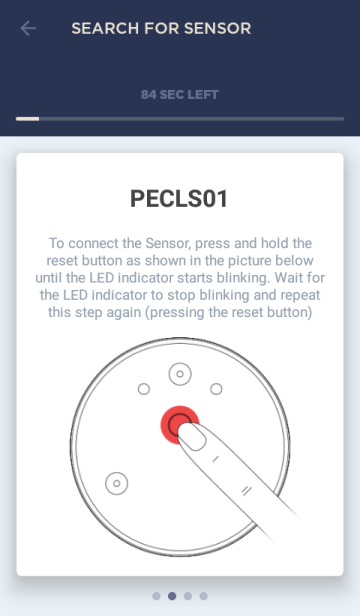
To connect the Sensor to the Control Gateway, you shall login to your Perenio Smart account and follow below steps:
- Click on the icon in the upper right corner of the “Devices” tab and select “Add new device”. Then, click on the “Sensors” button in the list.
- Select the Control Gateway to which the Sensor should be connected.
- Wait until the process of searching for Sensors starts, then press and hold the reset button until the LED flashes. Wait until it stops flashing, and repeat this step (pressing the reset button) again.
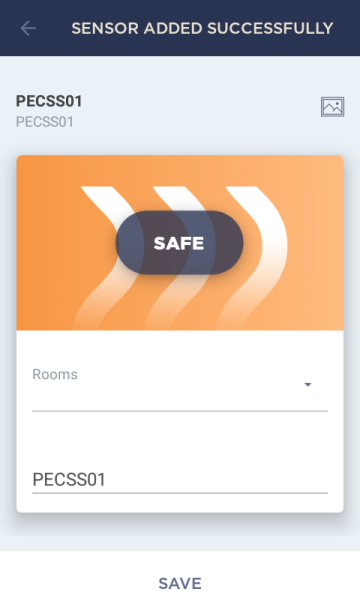
- After successfully connecting the Sensor to the Control Gateway, enter its name and select the room.

To check operation of the Smoke Sensor, it is necessary to press the Test Button in order for the signal to be emitted.
The scope of supply includes the Smoke Sensor (battery incl.), the reset pin, screws with dowels, the 3M Tape, the QSG and the Warranty Card.
Yes, the Smoke Sensor can be operated autonomously (without connecting to the Control Gateway). But in order to receive notifications on a smartphone, it is necessary to connect it to the Control Gateway first.
Under normal operating conditions, e.g. when the Smoke Sensor is installed on a ceiling in a room where a person smokes, it will not send alarms since concentration of visible smoke particles is too low to trigger the Sensor.
The Smoke Sensor can operate on a single battery for up to 36 months.
To check operation of the Smoke Sensor, it is necessary to press the Test Button in order for the signal to be emitted.
The following two ways are possible:
- In the case of false alarms, the signal will be automatically turned off in 10 seconds after being triggered.
- In the case of fire, the signal will be turned off only after removal of the fire source.
Possible reasons are as follows:
- - The Control Gateway is not activated in the Perenio Smart Mobile App or is not connected to the power supply;
- - The Sensor is already connected to another Control Gateway;
- - The Sensor battery level is too low;
- - The Sensor is located at a distance of more than 4.5 meters from the Control Gateway;
- - The Control Gateway is not connected to the network: Check the power supply;
- - A third-party sensor is connected that does not support a valid ZigBee Protocol.
The Smoke Sensor is NOT designed to detect gas, flames and high temperatures, as well as to extinguish fire. It is not recommended to install it in areas with a high vapor content since false alarms are possible.
Yes, of course. There are several options for correct relocation of the device, namely:
1. Install the Sensor in another Room (The Sensor will remain connected to the same Control Gateway) as follows:
- Move the Sensor to another room and make sure it is at an allowable distance from the Control Gateway;
- Install the Sensor in a new room;
- Change the Room in Sensor settings in the User Account.
2. Install the Sensor in another Room/Location (The Sensor will be connected to another Control Gateway):
- Sign in to the Perenio Smart app and select the Location where the Sensor is activated;
- In the ‘Devices’ tab, select the required Sensor from the list and click on the Settings icon;
- In the pop-up window, choose ‘Disconnect device’;
- Move the Sensor to another room and make sure it is at an allowable distance from the Control Gateway;
- Install the Sensor in a new room;
- Reconnect the Sensor to the Control Gateway through the Perenio Smart application.
Yes, you can disconnect the Sensor from the Control Gateway manually or in the Sensor settings in the application. In the first case, press and hold the reset button on the sensor until the LED flashes (It generally takes up to 5 seconds).
To check that the Sensor was disconnected, you should update the list in the “Devices” tab (Pull the screen down until the progress icon appears and the data is updated). If the Sensor is disconnected, it will disappear from the list of available devices.
The device is activated when Sensor parts become more than 2-3 cm apart from each other. There is no siren, but a corresponding notification is sent to the Perenio® Control Gateway in the case of triggering.
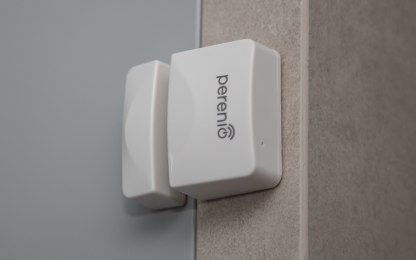
Both parts of the Door & Window Sensor shall be installed at the same height on the edge of the door/window frame so that in the closed state the Magnet is within 20 mm from the Sensor. It can be sticked on the 3M tape or screwed. For details on installation options, see the manual downloadable from our website.
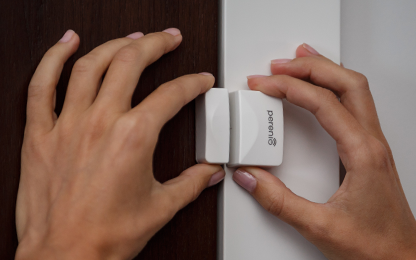
To switch on the Sensor, it is necessary to remove the back panel and pull out the battery insulating strip. After that, the LED under its casing will blink.
The scope of supply includes the Sensor (battery incl.), the reset pin, the screw with a dowel, the 3M Tape, the 3M Sponge, the QSG and the Warranty Card.
The Door & Window Sensor cannot operate autonomously, which means it is not capable to giving away a sound signal upon the door or window opening.
The Door & Window Sensor can operate on a single battery for up to 24 months.
Possible reasons are as follows:
- - The Control Gateway is not activated in the Perenio Smart Mobile App or is not connected to the power supply;
- - The Sensor is already connected to another Control Gateway;
- - The Sensor battery level is too low;
- - The Sensor is located at a distance of more than 4.5 meters from the Control Gateway;
- - The Control Gateway is not connected to the network: Check the power supply;
- - A third-party sensor is connected that does not support a valid ZigBee Protocol.
It is very likely that your Location is in the Disarmed Mode. In this case, notifications on the Door&Window Sensor actuation are displayed in the History tab only.
Yes, of course. There are several options for correct relocation of the device, namely:
1. Install the Sensor in another Room (The Sensor will remain connected to the same Control Gateway) as follows:
- Move the Sensor to another room and make sure it is at an allowable distance from the Control Gateway;
- Install the Sensor in a new room;
- Change the Room in Sensor settings in the User Account.
2. Install the Sensor in another Room/Location (The Sensor will be connected to another Control Gateway):
- Sign in to the Perenio Smart app and select the Location where the Sensor is activated;
- In the ‘Devices’ tab, select the required Sensor from the list and click on the Settings icon;
- In the pop-up window, choose ‘Disconnect device’;
- Move the Sensor to another room and make sure it is at an allowable distance from the Control Gateway;
- Install the Sensor in a new room;
- Reconnect the Sensor to the Control Gateway through the Perenio Smart application.
Yes, the Leak Sensor can be operated autonomously (without connecting to the Control Gateway) and send light and sound alarms in the case of actuation. But in order to receive notifications on a smartphone, it is necessary to connect it to the Control Gateway first.
The Sensor is sensitive to pouring of both detectors located at its bottom with liquid, after which the light and sound alarms are activated. In the case of connection to the Control Gateway, the Sensor transmits a corresponding signal to the Perenio Smart Mobile App.
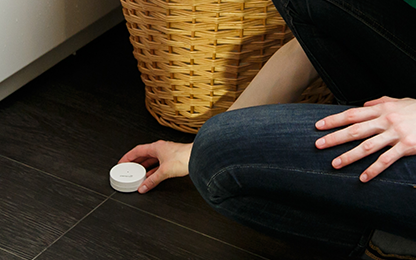
The Sensor shall be installed on a flat horizontal surface close to a possible source of leakage.

To connect the Sensor to the Control Gateway, you shall login to your Perenio Smart account and follow below steps:
- Click on the icon in the upper right corner of the “Devices” tab and select “Add new device”. Then, click on the “Sensors” button in the list.
- Select the Control Gateway to which the Sensor should be connected.
- Wait until the process of searching for Sensors starts, then press and hold the reset button until the LED flashes. Wait until it stops flashing, and repeat this step (pressing the reset button) again.
- After successfully connecting the Sensor to the Control Gateway, enter its name and select the room.
Yes, because the Leak Sensor is waterproof, so for some period of time it can be operated in water (provided the Sensor casing is tightly closed). Generally, in the case of flooding, the Sensor will be floating on the water surface.
The scope of supply includes the Leak Sensor (battery incl.), the QSG and the Warranty Card.
You should close contacts at the casing bottom, e.g. by touching both detectors with your fingers. If you hear a sound signal it means that the Leak Sensor is ready for operation. For details, see the manual available for downloading on our website.
The Sensor can be installed at a distance of up to 40 meters from the Control Gateway.
Yes, because these are areas where leakage is most likely to happen.
You can add an unlimited number of sensors to the control center.
Yes, you can. In this case, in order to distinguish between Sensors it is recommended to choose suitable names for them (e.g. “Sensor_basin”, “Sensor_washer”, etc.).
The Leak Sensor can operate on a single battery for up to 16 months.
You should remove the Sensor from the leakage area and wipe up its detectors.
Possible reasons are as follows:
- - The Control Gateway is not activated in the Perenio Smart Mobile App or is not connected to the power supply;
- - The Sensor is already connected to another Control Gateway;
- - The Sensor battery level is too low;
- - The Sensor is located at a distance of more than 4.5 meters from the Control Gateway;
- - The Control Gateway is not connected to the network: Check the power supply;
- - A third-party sensor is connected that does not support a valid ZigBee Protocol.
Yes, the Sensor will be activated when both detectors are in contact with any conductive liquid.
Yes, of course. There are several options for correct relocation of the device, namely:
1. Install the Sensor in another Room (The Sensor will remain connected to the same Control Gateway) as follows:
- Move the Sensor to another room and make sure it is at an allowable distance from the Control Gateway;
- Install the Sensor in a new room;
- Change the Room in Sensor settings in the User Account.
2. Install the Sensor in another Room/Location (The Sensor will be connected to another Control Gateway):
- Sign in to the Perenio Smart app and select the Location where the Sensor is activated;
- In the ‘Devices’ tab, select the required Sensor from the list and click on the Settings icon;
- In the pop-up window, choose ‘Disconnect device’;
- Move the Sensor to another room and make sure it is at an allowable distance from the Control Gateway;
- Install the Sensor in a new room;
- Reconnect the Sensor to the Control Gateway through the Perenio Smart application.
Yes, you can disconnect the Sensor from the Control Gateway manually or in the Sensor settings in the application. In the first case, press and hold the reset button on the sensor until the LED flashes (It generally takes up to 5 seconds).
To check that the Sensor was disconnected, you should update the list in the “Devices” tab (Pull the screen down until the progress icon appears and the data is updated). If the Sensor is disconnected, it will disappear from the list of available devices.
The PEACG01 Control Gateway is intended to unite operation of most Perenio devices (e.g. Motion, Leak, Door & Window and Smoke Sensors), collect data therefrom and notify Users in case they are activated.
There is such a possibility, however, the correct connection and control cannot be guaranteed, so you should consult with our Tech Support Department in each particular case.
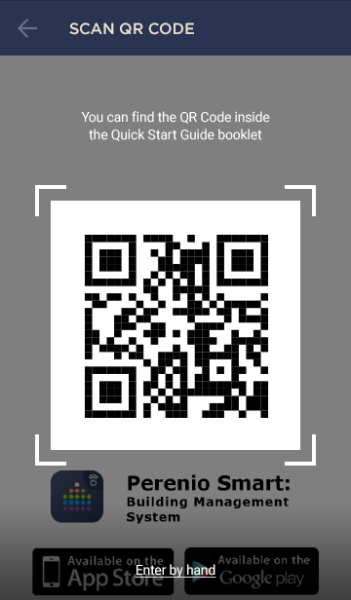
To activate the Control Gateway in the Mobile App, the below simple steps shall be followed:
- To your account or download the Perenio Smart application and register a new User account.
- Scan the Camera's QR Code and connect it to your Wi-Fi network.
- Wait until the automatic connection to the Remote Server and the Control Gateway is completed.
- Select the Location for the Control Gateway (Place of installation).
For more information, see below or download the manual from our website.
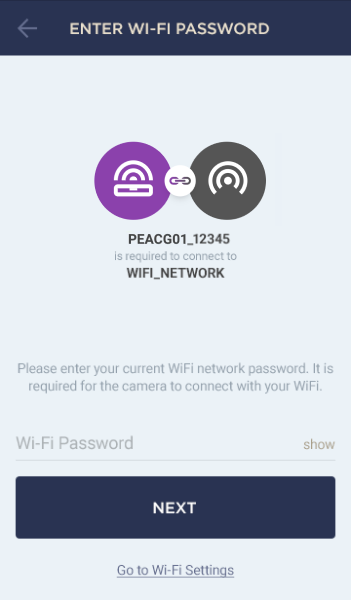
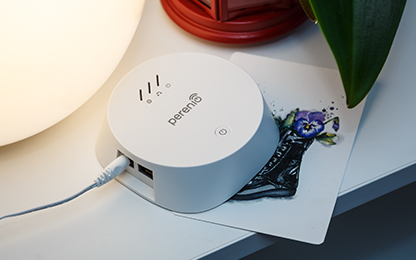
After the device is powered on, the power LED will light up, and a corresponding access point of this CG (containing its ID) will be displayed in the list of available networks in Wi-Fi Settings of your smartphone.
The Control Gateway shall be installed on a horizontal surface near the source of power (See examples below).
No, but such an option is planned to be implemented in the near future.
The reasons may be as follows:
- - Wi-Fi Network is of 5.0 GHz only (2.4 GHz network is required to connect the CG).
Solution: Change Wi-Fi router settings; - - Weak Wi-Fi signal from the router, or the CG is too far from it.
Solution: Locate the device closer to the router or restart it; - - Failure to transfer data of your Wi-Fi Network to the Control Gateway.
Solution: During connection of the CG, switch off the function of mobile data transfer; - - Lack of the Control Gateway access point in the list of available Wi-Fi Networks.
Solution: Reset the CG to factory settings (See the manual).
The reset to factory settings procedure shall be performed as follows:
- Press and hold the Reset button for at least 10 seconds.
- Release the Reset button after all LED Indicators on the Control Gateway blink three (3) times. Wait until the Power Indicator lights up (For cases when the device was not activated in the Mobile App) or both the WAN and the Power Indicators light up (For cases when the device was already activated in the Mobile App) and the CG reappears in the lists of available Wi-Fi Networks as an Access Point. As a rule, the reset to factory settings shall not take more than three (3) minutes.
The current firmware version is displayed in its control panel, which can be accessed by clicking on the desired Control Gateway in the “Devices” tab.
You can add an unlimited number of devices.
No, the Control Gateway may be activated in one User account only. However, the owner of the GG can share access rights to this device to other users.
The reasons may be power failures or the loss of Internet connection at the installation area.
Possible reasons are as follows:
- - There are no updates yet: Wait until a new firmware version is released;
- - There is no access to the Wi-Fi Network: Check that your smartphone is connected to the 2.4 GHz Wi-Fi Network and there is an Internet connection;
- - Unstable internet connection.
Reset the Control Gateway to factory settings (See the manual).
The Control Gateway can be connected to a Wi-Fi network of 2.4 GHz only. However, Wi-Fi routers of most manufacturers support both frequencies (2.4 and 5.0 GHz) now, so if your Wi-Fi network is set to 5.0 GHz only, you should add an access point with a frequency of 2.4 GHz and the CG will connect.
Yes, it is possible to add up to 100 sensors to a single Control Gateway being the part of the Smart Security Kit.
All data and device settings will remain unchanged. After the power is restored, the device will be restarted in about 5 minutes and will become available for the User. In case of connection failure, it is recommended to reset the device and restart the Mobile App.
You can add an unlimited number of devices.
Double-sided mounting tape which is a rubber or acrylic adhesive applied on both sides of the foam. It is used in order to avoid drilling holes and using fasteners.
Modern synthetic polymer with a high level of impact resistance and elasticity.
An auxiliary output in the device to connect the Mini-Jack of 3.5 mm to.
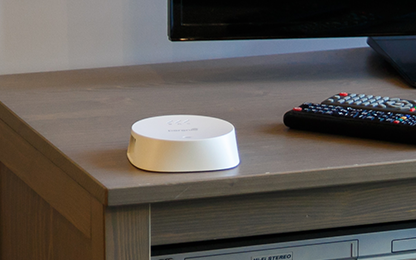
The Perenio® PEACG01 Control Gateway.
The Digital Signal Processor is a special microprocessor designed to ensure digitized signal handling (usually, in real time mode).
The Internet of Things is a system of Internet-connected devices able to collect and exchange data coming from builtin services.
The class of protection of the device casing indicating that its internal parts are protected from penetration of fingers or objects longer than 80 mm, as well as solid bodies larger than 12 mm. Such device is protected from vertically falling drops and condensation and is suitable for unheated rooms.
Degree of protection of the casing indicating that the device is fully protected from the penetration of dust and is suitable for short immersion in water under conditions established by the manufacturer.
A filter that blocks infrared waves in the daytime and allows you to create the correct image from the point of view of a human perception. At nights, the use of an IR Filter is not required.
General designation of a home and office where Perenio® devices are installed.
A small-sized electronic memory device that is used for storage of digital information.
The IP Camera which (upon connection to the Internet) automatically sends a request to a remote server. This server then identifies the Camera by its unique ID. To access the Camera and watch the video, the User shall install a special software developed by the IP Camera Manufacturer.
Software developed by Perenio IoT for remote control of various devices from smartphones.
The passive infrared sensor with a pyroelectric sensing element that responds to changes in heat emission.
The quick response code which represents a matrix barcode containing information about the object to which it is linked.
The Real Time Clock is an electronic circuit for tracking the current time, date, day of the week, etc. As a rule, such a circuit has a self-contained power supply, which ensures operation even when the main device is turned off.
The area that falls into the field of viewing of the Camera or Sensors. The viewing angle depends on the focal length of the Camera lens and the image sensor size.
Perenio® Cameras and Control Gateways that are connected to Wi-Fi Network, as well as activated in the Mobile App by scanning the QR Code or entering IDs manually.
A network protocol designed for secure transmission of data at low speeds, which is recognized for an extremely low power consumption.
- All categories
- Glossary
- Apple HomeKit
- Amazon
- Voice Control Setup
- Power Link
- Red Atom
- Portable UV Lamp Mini Indigo
- Smart UV Disinfection Kit UV Lightsaber
- Power Link Wi-Fi
- Google Assistant
- Notifications
- Control Gateway
- Indoor Motor Camera
- Indoor Fixed Camera
- Smoke Sensor
- Leak Sensor
- Door & Window Sensor
- Motion Sensor
- Smart Security Kit
- Powering on
- Installation
- Connection to the Mobile App
- Specification